If you've always wanted to make a board just like your favorite board game for your table top games, you'll want to see this!
My son loves to play the X-Wing miniatures game so I decided to build him a game board we could play on. It would have plenty of stars, planets, nebulas, and other spacey things. It would also have an area where the ship cards could sit without interfering with the play space.
The first thing to decide on was the size. I checked the Fantasy Flight website and found the rules for both the game and the tournaments. They both suggest a play area of 3' x 3'. So I figured that, plus the size of the cards for two players would warrant a board 3' x 3'6" (each card is 2 1/2" tall).
So on to how to build the board.
I use foamboard. The boards come in 20" x 30" and you will need four of them for our size board. If you want a bigger board, say a 4' x 4' board, you'll need boards at least 2' x 2'. You are going to make the board in quadrants, so all four pieces will have to be the same size. You can have a long edge if you'd like to fit your dimensions. Just make sure each board is cut identically.
You will also need duct tape (any color will work). Duct tape holds up a lot longer than other tapes.
Step 1: Cut your boards to size. You should have four equal pieces.
Step 2: Find your top sections and connect two of them with the duct tape. Trim the ends so they are flush.
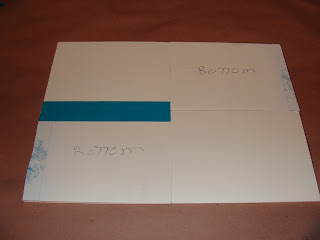
Step 3: Fold the two pieces you just made. The pieces should fold with no tape showing. The bottom should be showing on both pieces. Now, connect the two pieces with one piece of tape. Your board should look like the one below.
Step 4: Open your board. It should look like the picture below. This is with the bottom side up.
The top side should have two pieces of tape running the entire length of the board. One end will be connected and the other end should be loose.
If you want to give your board some further strength, place duct tape around the edges of the board. Use one strip of duct tape, folding it over to cover both sides. Use only one strip for each section or the boards won't bend anymore. Keep going around the board until the sides are covered.
Step 5: Now, your board is done. To fold your board, pick up the top end that is attached and not loose. Fold it over.
Step 6: You should see just the bottom part of the board. Now grab the top half and fold it down.
Step 7: Your board is now completely folded. Great job!
Now you can decorate your board. Paint it all black and add stars for a space board. Paint it brown and its a desert board. You can also print out a game board with the computer and 8" x 11" adhesive paper, one for each quadrant of the board. Use Avery full sheet labels for this. Don't forget to paint the bottom also for that high quality look.
Next time, I'll show you the finished board in all its glory.

This site is dedicated to the creation of wargames terrain for table top and roleplaying games, both science fiction and fantasy. I focus on the creation of wargames terrain that looks realistic, but is inexpensive to make from easy to get materials for those who don't want to pay a fortune for their battlefields. I will also include my own armies, painting techniques, and the occasional win (I'm a horrible player). For more, visit my website: http://creativeminiaturehobbies.com


No comments:
Post a Comment